The message comes in between two ordinary ones. A client you have worked with for a few months writes: “Quick one. Can I pay you in USDT this time? It’s easier for me than a bank transfer.” You have heard of USDT, maybe a friend uses it, but you have never received any. The best first reply is neither yes nor no. It is: “Probably. Give me a day to set it up and I’ll send you the details.”
Before you say yes, set up five things. One: a place to receive the money that you have already verified, so a deposit can actually land. Two: the exact network the payer will send on, named the same way on both sides. Three: who pays the transfer fee, so the amount you agreed is the amount that arrives. Four: how you will confirm the payment arrived, from inside your own account rather than from a screenshot. Five: how you will turn the USDT into money you can spend where you live. With those five in place, saying yes is easy. When a first crypto payment goes wrong, it is usually one of these five that was skipped.
This guide takes them in the order you would actually do them, and adds the two habits people skip: a small test payment the first time, and a record of every transfer from day one. None of it is hard. Most of the waiting is for an account check, which is why it pays to start today rather than on the day the money is due.
What USDT is, seen from the receiving side
USDT is a digital token designed to stay worth about one US dollar, and the same token exists on several different blockchains, which exchanges and wallets call networks. For you as the receiver, that sentence holds most of what matters. One USDT is meant to equal one dollar, so a client can price your work in dollars and send the same number of tokens. But “USDT” on its own does not say where the tokens will travel: USDT on TRON, USDT on BNB Smart Chain and USDT on Ethereum are the same kind of dollar token moving on separate roads, and an address set up for one road does not receive from another. The token is issued by a private company, not a bank or a government, so the one-dollar value is what it is designed to hold, not a promise anyone will enforce for you. It is not a bank deposit and there is no deposit insurance behind it. That is one reason many people who get paid in USDT convert most of it soon after it arrives, instead of holding large balances for months.
Why people pay in USDT, and the signs that something is off
Most people who offer to pay in USDT have an ordinary reason: for them it is cheaper, faster or simpler than an international bank transfer, or they already hold it. Receiving USDT is not suspicious in itself. What matters is the direction the money moves and what you are asked to do before you get paid.
Common, legitimate reasons you will hear:
- A client in another country whose bank charges a lot for international transfers, or where a wire takes several days to arrive.
- A company or platform that pays its contractors in stablecoins as a routine, the same way for everyone.
- A relative working abroad who is already paid in USDT, or who finds it easier than a remittance counter.
- A buyer of something you sell who holds crypto and prefers not to use a card or a bank.
- A payer who has had transfers delayed or questioned by their bank and wants something that settles the same day.
None of these needs anything from you except a place to receive and the details to send to. That is the test. A real payment needs your address or your account ID, the network, and an amount. It does not need your password, a code from your phone, a “connection” between your wallet and a website, or money from you first.
The warning signs are the opposite of that:
- You are asked to send money before you are paid: an “activation fee”, a “deposit before withdrawal”, a “tax” or a “release charge”. The US Federal Trade Commission puts it bluntly: no legitimate business is going to demand that you send cryptocurrency in advance.
- The payer “overpays” and asks you to send the difference back, to them or to someone else. The FTC describes the older version of this with fake checks; the crypto version often involves a payment that never really arrived.
- You are sent a link to “claim” or “receive” your payment on a website, or asked to connect a wallet app to it.
- You are asked for your login details, a verification code, or your wallet’s recovery phrase, “so the payment can go through”.
- You get a screenshot of a transfer and pressure to deliver the work or the item right now, before you can check your account.
- The work itself looks strange: a job that appeared out of nowhere, pays well for very little, and is run entirely through a chat app. If that is your situation, read how to check a job that pays in USDT before you set up anything.
A simple rule covers most of these. In a real payment, money only moves toward you. The moment a plan needs money, codes or access to move away from you first, stop and look again.
Where the money should land: an exchange account or your own wallet
For a first payment, most people are better off receiving into a verified account at a crypto exchange, because they will need to convert the USDT into local money and the exchange is where that happens. A self-custody wallet is a real alternative, and some people prefer it, but it adds a step at exactly the moment you want fewer steps.
The two options work differently:
- An exchange account is an account with a company that holds crypto for you, a bit like a bank holds your money. You get a deposit address for each coin and network from its deposit page, the USDT shows in your balance once it arrives, and you can sell it there for your local currency. You have to verify your identity before you can use it properly.
- A self-custody wallet is an app that holds the keys to your crypto on your own device, protected by a recovery phrase (a list of words). Nobody can freeze it, but nobody can recover it for you either. To turn USDT into local money, you usually have to send it from the wallet to an exchange or to a buyer first.
| Exchange account | Self-custody wallet | |
|---|---|---|
| Setting up | Sign-up plus identity verification, which can take a day or two | Install an app and write down a recovery phrase |
| Who controls the tokens | The exchange holds them in your name | You do, through the recovery phrase |
| Turning USDT into local money | In the same place, through the exchange’s sell or P2P options | Send to an exchange or a buyer first |
| Moving USDT out later | The exchange’s withdrawal fee, shown on the withdrawal screen | You pay the network fee yourself, from the wallet |
| If you lose access | Account recovery through the exchange’s support | Without the recovery phrase, the funds are gone |
| Main thing that can go wrong | Account restrictions or checks, and depending on one company | Your own mistakes, a lost phrase, fake wallet apps |
One detail catches self-custody users on TRON, the network many payers pick for USDT. USDT on TRON is a smart-contract token, so every transfer of it uses a network resource called energy, and if the sender’s wallet has no energy the network burns TRX, TRON’s own coin, from the sender’s balance instead. In practice that means a wallet holding only USDT on TRON can receive it but cannot move it out until you add some TRX. People discover this on the day they try to sell. An exchange account avoids that particular problem, because the exchange handles the network side when you sell or withdraw.
My own habit, for anyone receiving their first payment: use an exchange account, keep it simple, and consider a self-custody wallet later, once you know how much you actually want to hold.
Verify the account before you hand out any address
This is the step people rush, and it is the one that decides whether the money can land at all. Exchanges generally require identity verification before you can deposit and use funds normally. On Binance’s help pages, for example, being verified is what allows crypto deposits, trading and access to the other products, and existing unverified accounts are limited to “Withdraw Only”. An unverified account is not a place to receive money.
Verification usually means choosing your country of residence, uploading an identity document (a passport, ID card or driver’s license, depending on the country), and doing a face check with your phone camera in good light, without a hat, glasses or filters. Then you wait for a review. It is often quick, but the published expectation is “usually within 48 hours”, with some cases taking longer. So do it before you agree a payment date with anyone, not after.
Three practical points:
- Use your own name and your own documents. Do not receive into a friend’s or relative’s account “just this once”. The money then legally and practically sits in their account, and when you sell it later, the name on your bank account will not match the name on the exchange account.
- Before you sign up, check that the exchange serves your country and what your country’s rules say about receiving and selling crypto. That depends on where you live, and it is easier to learn now than after money has arrived.
- Turn on two-factor authentication (a login code from an app or a security key) before any money lands. It takes two minutes.
If you don’t have an exchange account yet and this payment is the reason to open one, the guide to opening a Binance account you can get paid into goes through sign-up, verification and the first deposit screen in the order you will see them.
Pick one network and name it exactly
The network is the part of a USDT payment most likely to cost you money, so agree on one before the payer sends anything, and write its name the way both platforms show it. The tokens are the same kind on every network, but the networks don’t talk to each other. If the payer sends on one and your address was made for another, the money may not arrive and may not be recoverable.
Here is how it works on your side. On an exchange’s deposit page you choose the coin (USDT), then choose a network, and the page shows an address and a QR code for that pair. Exchanges spell this out on the deposit screen: the network you select must be the same as the network the sender uses on the platform they are withdrawing from. The address for USDT on TRON and the address for USDT on BNB Smart Chain can look completely different, and some pairs of networks even use addresses that look alike, which is why “the address looks right” is not enough on its own.
Platforms name the same networks differently. You will see:
| Network | Other names you may see | Address usually starts with |
|---|---|---|
| TRON | TRC20, TRX | T |
| BNB Smart Chain | BEP20, BSC | 0x |
| Ethereum | ERC20, ETH | 0x |
Write both names in your message, for example “TRON (TRC20)”. A payer whose screen says “TRC20” and whose instructions say “TRON” may hesitate, or worse, guess.
How to choose the network
You don’t need an opinion about which network is best. You need one network that both sides have. Ask the payer which networks their platform or wallet offers for sending USDT, then open your own deposit page and check which of those it lists. If several match, a few things help you choose:
- Fees. The sender pays the network cost, and the cost differs a lot between networks. The sender’s platform shows its own fee for each network on the withdrawal screen, so let them tell you which is cheaper for them.
- Speed. Blocks on TRON come about every 3 seconds and Ethereum works in slots of about 12 seconds, but your account credits a deposit only after the number of network confirmations the exchange requires, and the time that takes depends on the blockchain and how busy it is. In ordinary conditions both are fast enough for a payment between people.
- What you will do next. If you plan to sell on the same exchange, any network it supports is fine. If you plan to move the USDT on somewhere else later, a network your other platform also supports saves a conversion step.
For many first-time receivers the answer ends up being TRON, simply because many payers already hold USDT there and exchanges widely support it. That is not a rule, and if your payer’s platform shows a lower fee on another network you both support, use that one.
Check the network is open on the day
Exchanges sometimes pause deposits on a network for maintenance or upgrades. A deposit sent while it is paused usually waits and is credited once the network reopens, but it is a stressful wait on a first payment. Most exchanges have a status page for this. Check it on the day the payer sends, and again if a payment seems slow.
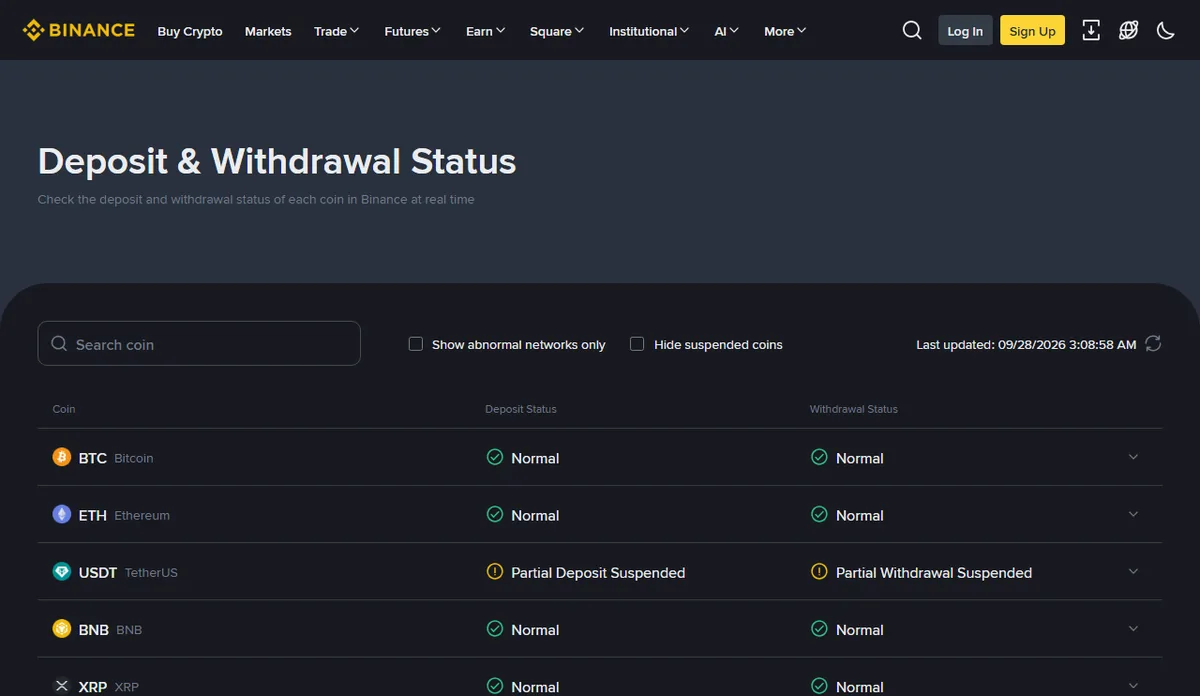
The screenshot is from one moment; what matters is knowing where the page is on your platform, not what it said on a particular day.
Memo or tag: only if your page asks for it
Some coins need an extra field called a memo or tag, which identifies which account a deposit belongs to. USDT on TRON, BNB Smart Chain and Ethereum normally doesn’t use one. The rule is simple: if your deposit page shows a memo field for the coin and network you picked, the payer must include that memo, and you should copy it into your message next to the address. If there is no memo field, don’t invent one.
Where this comes from checked September 2026
The account and deposit steps come from Binance’s help pages on identity verification, depositing crypto and deposits that haven’t been credited, used here as an example of how exchanges handle this. The warnings about sending money first and about payments being hard to reverse come from the FTC’s What To Know About Cryptocurrency and Scams. The point about energy and TRX on TRON comes from the TRON developer docs on the resource model. The screenshot shows the same exchange’s public Deposit and Withdrawal Status page. The screen descriptions follow those public pages rather than a signed-in walk-through, so button names in your app may differ slightly.
Agree the terms before any money moves
Settle five terms in writing before the payer sends anything: the price and its currency, the network, who covers the fee, the deadline, and a small test payment. Writing them down takes five minutes, and it turns most later arguments into a matter of pointing at a message.
Price in USD or in USDT
You can price in US dollars and accept USDT as the way of paying, or you can price in USDT directly. For most people I’d price in dollars and let USDT be only the payment method: “600 USD, payable as 600 USDT”. The agreement then doesn’t depend on the token. If the client later wants to pay by bank transfer instead, or if the token briefly trades a little away from one dollar, the amount owed hasn’t changed. If you price in your local currency instead, say which rate converts it to USDT and on which day, otherwise the two of you will look at different rates and both feel short-changed.
The network
Name one network, both ways, as above: “USDT on TRON (TRC20)”. Add that the payer should tell you before sending if their platform doesn’t offer it.
The fee
Say who pays the transfer cost, and say it as a result rather than a process: “Fees paid by the sender; the full 600 USDT must arrive.” The reason is that the network cost on-chain is paid by the sender’s side anyway, but many exchanges take their withdrawal fee out of the amount the sender enters, unless the sender adds it on top. As an example with invented numbers: if the payer types 600 into their withdrawal screen and their platform’s fee for that network were 1 USDT, you would receive 599. Neither of you did anything wrong, but you are one dollar short and someone has to decide who absorbs it. Agree it in advance and the question never comes up.
The deadline and the delivery order
Write when the payment is due, and who goes first. For a new client, a common pattern is part of the payment before you start and the rest before you hand over the final work. For a sale, deliver after the money is credited in your account, not after you are told it was sent. Also agree what happens if the payment arrives late or short, even if it is one line: “If less than 600 USDT arrives, the difference is added to the next payment.”
The test payment
Ask for a small test payment the first time, every time, even from someone you trust completely. The payer sends a small amount, you confirm it arrived in your account, and only then do they send the rest to the same address on the same network. It costs one extra transfer fee. In exchange, it removes the worst failure there is: the whole amount going to a wrong address, a wrong network or without a required memo, where it may never be recovered.
This matters because crypto payments generally can’t be reversed. As the FTC puts it, once you pay with cryptocurrency you can usually only get your money back if the person you paid sends it back. If the address or network is wrong, there may be nobody to send it back. A test turns that risk from “the whole payment” into “the test amount”.
Two details make the test useful:
- Make the test bigger than any minimum deposit your deposit page shows for that coin and network. A deposit below the minimum may not be credited, which tells you nothing except that the test was too small.
- Ask the payer to save your address in their platform’s address book after the test, and to send the rest from that saved entry. Retyping or re-pasting from a different message is how a correct test is followed by a wrong main payment.
Who pays the extra fee for the test is part of the fee term. With a client, I’d simply ask them to cover it as part of “fees paid by the sender”. With family, it is often easier to cover it yourself.
The message you send back
Send all the payment details in one written message: coin, network with both names, address, memo if your page shows one, amount, the fee term, the test step and the deadline. One message is easier for the payer to follow and easier for you to point to later. Copy the address from your deposit page with the copy button. Never type an address by hand.
Payment details message (edit the brackets)
Hi [name], thanks. Yes, USDT works for me. Here are the details:

Coin: USDT
Network: TRON (TRC20). Please send on this network only.
Address: [paste from your deposit page]
Memo: [only if your deposit page shows a memo field; otherwise delete this line]

Amount: 600 USDT for [invoice number or job]. Please cover the transfer and withdrawal fees so that the full 600 USDT arrives.

As it's the first time, could you send a small test of 20 USDT first? I'll confirm as soon as it shows in my account, and then you can send the remaining 580 USDT to the same address.

Due by: [date]

If your platform doesn't offer TRON (TRC20) for USDT, please tell me which networks it does offer before sending anything, and I'll check which one I can receive.
The amounts in the message are an example: a 600 USDT payment split into a 20 USDT test and 580 USDT for the rest, adding up to 600. Adjust both numbers to your case, and keep the test above any minimum your deposit page shows.
Before you press send, check four things:
- The address was pasted, not typed. Then compare the first four and last four characters of what you pasted with what your deposit page shows. Malware that swaps copied addresses exists, and this check catches it.
- The network in the message matches the network you selected on the deposit page when you copied the address. It is easy to copy a TRON address and write “BEP20” out of habit.
- You are sending it through the channel you normally use with this person, the same email thread or chat where you discuss the work. If the payer later “confirms” an address that is different from yours, even by one character, stop and resend yours from your deposit page.
- Nothing extra is attached. No login, no code, no screenshot of your account balance. The payer needs the address, not access.
If the payer replies that their platform only offers a network you don’t have, don’t improvise. Check your deposit page for that network once more, and if it really isn’t there, agree another network you both have, or wait until you have an account that supports it.
How to confirm the payment has arrived
A payment has arrived when you can see it credited in your own account’s deposit history, not when the payer sends a screenshot, a “success” message or a link. Screenshots can be edited and links can lead to fake pages. Your own account is the only place that counts.
Open the exchange app or website yourself, the way you normally log in, not through a link someone sent. Go to your deposit history (often under the wallet or assets section). A deposit usually appears first as pending or confirming while the network confirmations add up, and then as completed or credited, at which point it shows in your balance. That last status is the one to wait for before you deliver anything.
If the payer gives you a transaction ID (TXID, sometimes called a hash), you can also look it up on a public block explorer for that network: Tronscan for TRON, BscScan for BNB Smart Chain, Etherscan for Ethereum. The explorer shows whether the transfer succeeded, the address it went to, the token and the amount. Check that the “to” address is yours and that the token is USDT. A successful transfer on the explorer that isn’t yet in your account usually means the exchange is still counting confirmations or deposits on that network are paused, which is when the status page earns its place.
The guide on checking whether a crypto payment has really arrived goes through each status you might see and what to do when the explorer and your account disagree.
Turning USDT into local money
Most people receiving USDT for the first time convert at least part of it, and the usual route is to sell it on the same exchange, either directly or to another person through a peer-to-peer (P2P) market. On a P2P market you pick a buyer’s offer, the platform holds your USDT while the order is open, the buyer sends local currency to your bank or mobile-money account, and you release the USDT only once you see the money yourself.
Three habits make a first sale go smoothly:
- Receive the local money into an account in your own name, the same name as your verified exchange account.
- Confirm the money in your bank or mobile-money app before you release anything. A payment screenshot from the buyer is not a payment.
- Look at the full cost before you pick an offer: the price the buyer offers per USDT, any trading fee, and what your bank charges to receive. These change, so check them on the screen at the time rather than trusting a figure from last week.
The step-by-step for a first sale, including what each screen shows and what to do if a buyer pays from someone else’s account, is in selling USDT on P2P for the first time.
Whether to convert everything at once is a separate decision. Holding some USDT can make sense if you pay for things abroad or expect to send it on. But because a stablecoin is not a bank deposit, I’d convert what you need for rent, bills and anything due soon, and only keep an amount you would be comfortable having tied up in one company’s token. The trade-offs are laid out in whether to keep USDT or convert it. None of this is investment advice; it is about not leaving money you need in a form you can’t spend.
Records to keep from the first payment
Keep a simple record of every payment from the very first one: the date, who paid, what it was for, the amount agreed, the amount received, the network, the transaction ID, and what you converted it into. It takes a minute per payment, and it is very hard to rebuild months later.
You will want it when your bank asks where a deposit came from, when an accountant prepares your tax return, when a client disputes whether they paid, or when the exchange asks you about the source of a deposit. Tax treatment of crypto income and conversions depends on where you live, so ask a local accountant how to report it; this guide doesn’t give tax advice. What an accountant will ask for, almost anywhere, is a clear trail from “work done” to “money in my bank”.
A spreadsheet or a notes file is enough. A row might look like this (all numbers invented for the example):
| Field | Example |
|---|---|
| Date received | 2026-10-03 |
| Payer | Client name or relative’s name |
| For | Invoice 014, logo design |
| Agreed | 600 USD, payable in USDT |
| Received | 20 USDT test + 580 USDT |
| Network | TRON (TRC20) |
| Transaction IDs | The two TXIDs from your deposit history |
| Converted | 580 USDT sold on 2026-10-04, P2P order number, local amount received |
| Bank line | Date and reference of the incoming bank payment |
Alongside the table, keep:
- The written agreement or invoice showing the amount, currency and network.
- The message in which you sent your payment details, so you can show which address and network you gave.
- Your own screenshot of the credited deposit in your account history, with the date visible.
- The order record of each conversion, and the matching line on your bank statement.
If you keep only one thing, keep the transaction IDs. With a TXID anyone can look up the transfer on a block explorer, years later, without needing access to your account.
When the payer is family, a buyer or an employer
The five steps stay the same for every payer, but what you agree on and what you watch for changes with who is sending. The address, network and test payment work the same way; the terms and the warning signs differ.
Family sending money home
Family transfers are usually regular, smaller, and built on trust, which is exactly why the test payment still matters: the person sending is often as new to this as you are, and a wrong network costs a family the same as it costs a business. Agree who pays the transfer fee and who pays for converting to local money, because over a year of monthly transfers those costs add up. It is also worth comparing the whole route, fees plus the rate you get when converting, with a regular remittance app or money-transfer service. Sometimes USDT is cheaper and faster; sometimes the difference is small and the remittance app is simpler for an older relative. The comparison is set out in family money: USDT or a remittance app.
With family, one more thing helps: write the payment details on paper or save them in the relative’s platform address book with a clear name, so they don’t have to search old chats each month.
A buyer paying for something you sell
When you are selling a phone, a laptop, a service or a digital item, the order of events is the whole game. Hand over the item or the access only after the full amount is credited in your account. Buyers who are genuine understand this; buyers who push hard for delivery “because the transfer is on its way” are the ones to slow down with. Be especially wary if a buyer claims to have sent too much and asks you to refund the difference. Check your account for the exact amount credited, and refund only what actually arrived above the agreed price, back to the address it came from, or not at all until you are sure.
An employer or regular client
For regular pay, put the currency and network in the contract or the standing agreement, not just in a chat: “Paid monthly in USD, settled as USDT on TRON (TRC20) to the address below.” Do the test payment with the first salary or the first invoice, and ask the payer to save your address. If you ever change your address or network, tell them in writing and do a new test, and say explicitly that the old address should no longer be used.
Ask for an invoice or payslip trail for each payment. Paying in USDT doesn’t change the fact that you did the work, and if you ever need to show income for a visa, a rental or a loan, a clean record of invoices matched to transaction IDs helps a lot.
Watch for one pattern in particular: a new “employer” who asks you to receive money and forward it to someone else, or to buy crypto for a “client” with money they sent you. The FTC describes versions of this where the money turns out to be fake, the crypto is gone, and the person in the middle ends up owing the bank. A real employer pays you; they don’t route other people’s money through you.
What went wrong: what you see, what probably happened, what to do
When a payment doesn’t look right, start from what your screen actually shows, not from what the payer says. This table covers the situations first-time receivers run into most.
| What you see | What probably happened | What to do |
|---|---|---|
| The payer says they sent it, but nothing appears in your deposit history | The transfer is still confirming, deposits on that network are paused, or it went to a different address or network | Ask for the TXID and look it up on the network’s block explorer. If it shows success to your address, check the exchange’s status page and wait. If the “to” address isn’t yours, ask the payer to compare it with your message |
| The explorer shows success to your address, but your balance hasn’t changed | The exchange is waiting for more confirmations, or deposits on that network are temporarily suspended | Wait, and check the status page. If it is still missing after the network is open and busy periods have passed, contact the exchange’s support with the TXID |
| The payer sent on a network your deposit page didn’t list for that address | A network mismatch; the funds may not be credited and may not be recoverable | Contact the exchange’s support with the TXID and the network, and ask whether recovery is possible. Don’t promise the payer anything. For the rest of the payment, restart with a test |
| A deposit needed a memo, and the payer left it out or typed it wrong | The exchange can’t match the deposit to your account automatically | Contact support with the TXID, your memo and the amount. Next time, put the memo on its own line in the message |
| Less than the agreed amount arrived, for example 599 instead of 600 | The sender’s withdrawal fee was taken out of the amount they entered | Point to the fee term you agreed and ask for the difference, or add it to the next payment. If you didn’t agree a fee term, add one now |
| The small test payment never showed up | It was below the minimum deposit your page shows for that coin and network | Check the minimum on your deposit page, and ask the payer to send a slightly larger test |
| You were sent a screenshot of a “successful” transfer, but your account shows nothing | The transfer is pending, went elsewhere, or the screenshot isn’t real | Go by your own account only. Ask for the TXID and check it. Don’t deliver until it is credited |
| The payer says they overpaid and asks you to send back the difference | Often the “overpayment” never arrived, or the whole payment isn’t what it seems | Check the exact amount credited in your account. Send back only a real excess, to the same address, or wait until you are sure |
| You are asked to pay a fee, enter a code or connect your wallet to “release” the payment | A scam; receiving needs only an address | Stop replying, send nothing, and don’t click the link. Check your own account directly |
| The payer sent USDC, or some other token, instead of USDT | A different coin than agreed; your address may or may not support it on that network | Check your deposit page for that coin and network, then contact support with the TXID if it isn’t credited. Agree the coin again before the next payment |
| The deposit is credited, but you can’t sell or withdraw | Your verification isn’t complete, or the account has a pending check or restriction | Open the account’s notifications and verification page and follow what it asks. Use the exchange’s own support channel in the app, not a “support agent” who contacts you first |
If your case isn’t in the table, the order of checks is the same: your deposit history first, then the TXID on a block explorer, then the exchange’s status page, then the exchange’s support with the TXID in hand. Almost every problem is solved or at least pinned down by those four steps, in that order.
Now go back to the message that started this. If your account is verified, you know your network, and your payment-details message is drafted with a test amount in it, you can answer the client today: “Yes, USDT works. Here are the details.”
Questions readers ask
What if the payer offers USDC or another stablecoin instead of USDT?
Treat it as a different coin, not a variation of USDT. Open your deposit page, choose that exact coin, check which networks are listed for it, and copy the address the page gives you for that coin and network. Send the payer a fresh message with the new coin name, and ask for a small test again, because the first payment of any new coin or network is where mistakes happen.
Is it safe to share my deposit address with the person paying me?
Yes, sharing it with the payer is normal. An address can only receive; nobody can take money out of your account with it. It is visible on the public blockchain together with the transfers it receives, so give it to the people who need it rather than posting it publicly, and never share your password, verification codes or recovery phrase along with it.
Can the payer cancel or take back a USDT payment after it arrives?
Once a transfer is confirmed on the blockchain, the sender cannot pull it back on their own. The usual way money goes back is that the receiver sends it back. That protects you once the payment is credited, but it also means a payer who made a mistake depends on your goodwill, so agree terms clearly before anything is sent.
The payer says I must pay a small fee or enter a code to release the payment. Should I?
No. Receiving USDT needs only an address, or an account ID on the same platform. A request to pay a release fee, top up a balance, share a login code or connect your wallet to a website before you can be paid is the pattern of a scam. Stop replying, do not send anything, and check the payment in your own account.