Someone has offered to pay you in USDT and you’ve decided Binance is where you’ll receive it. Here is the whole route, in the order I’d follow it:
- Check that Binance serves the country you live in.
- Sign up with an email address or phone number that you control.
- Verify your identity and wait until the account shows as verified.
- Secure the account: a password you use nowhere else, plus two-factor authentication.
- Find your deposit address and write down which network it belongs to.
- Ask the payer for a small test payment, and confirm it has arrived before the full amount is sent.
The snags cluster in three places. Verification can sit “under review” longer than people expect, so start it days before you need the money, not the morning of. The network is the step people rush: an address copied for one network and paid on another is the classic way to lose a payment. And the most avoidable mistake is giving out an address before the account is verified, which leaves the payer waiting and you with nothing to show. Each of those has its own section below, and near the end there’s a list sorted by what you actually see on screen.
What to have ready before you start
You need three things: an email address you control, a phone you can receive codes on, and a current identity document. Everything else is time and attention.
The email address. Use one that only you read and that you expect to keep for years. Avoid a work address that disappears when you change jobs, and avoid an address a relative or the payer set up for you. Security alerts, account recovery and deposit notices all go to that inbox. If someone else can read it, they can see what happens to your money, and in the worst case they can start a password reset.
The phone. You can register with a phone number instead of an email, and either way you’ll want a phone for security codes. The device matters more than the number, because the authenticator app I suggest later lives on it. If the phone is shared with family, or you’re about to replace it, sort that out first. Moving two-factor authentication to a new phone is possible, but it’s a job to do calmly, not while a client is waiting to pay you.
The identity document. Binance’s verification page asks you to pick a document type from a list that depends on your country; the kinds it names are a passport, a national ID card or a driver’s license. Check that the document hasn’t expired and that the name on it is the name you want on the account. That second point matters more than it looks. When you later sell USDT for local money on Binance’s P2P market, Binance asks that the bank account or wallet you use is in the same name as your verified Binance account. If your bank spells your name differently from your passport, notice it now rather than in the middle of a sale.
A camera and decent light. Verification includes a face check, and Binance’s own instructions for it are short: “Do not wear hats, glasses, or use filters, and make sure that the lighting is sufficient”. A phone camera near a window in daytime does the job.
Before any of this, check that Binance serves the country you live in, and what your country’s rules say about receiving and selling crypto. I don’t list countries here, because the list changes and your local rules are for you to confirm, not for me to guess.
One thing you don’t need yet is anything from the payer. You’ll send them an address and a network at the end, once you know the account can take a deposit. If they’re pushing you to “just send an address now”, it’s normal and fair to reply that you’re finishing verification and will send details by a given day.
A realistic timeline helps with that reply. Signing up takes minutes. Verification is where the time goes: Binance says the review is “usually within 48 hours. However, it may take longer in some particular cases.” Finding the deposit address takes a minute once you’re verified. The test payment depends on the network and on how quickly the payer acts. So if a client wants to pay on Friday, start on Monday.
Sign up with the referral code attached
The referral code is attached at the very start: you open Binance’s sign-up page through a referral link, and the code travels with your registration. There’s no referral field on the first sign-up screen, so opening the page through the link is the step that counts.
Referral code for this step
Open Binance’s sign-up page through this link and the referral code BNB986 is attached to your registration. The trading-fee discount you get is the one shown on Binance’s page when you sign up (up to 20% off at the time of writing; Binance can change it).
Open Binance sign-up (referral link, code BNB986)Referral link. Paylark may earn a commission if you sign up through it; it doesn't add to your fees.
What the code changes is small and specific: a discount on trading fees, the one Binance shows at sign-up. What it doesn’t change is anything about receiving money. Deposits, verification, your address and the network work exactly the same with or without a code. If you’d rather not use a referral link at all, type binance.com into your browser yourself and register there; every other step in this guide still applies.
Why it has to happen now: Binance lets a code be added after registration only under a narrow set of conditions, and once a referral relationship exists it can’t be changed or removed. If you want a code, the sign-up is the moment. If you’ve already registered, the section after next explains whether you still can.
One check costs nothing. When the page opens, look at the address bar and make sure you’re on a binance.com address. Once you’ve finished signing up, bookmark it, and from then on open Binance from the bookmark or the app rather than from links in emails or chats. The security section says why.
The first screen asks for one thing
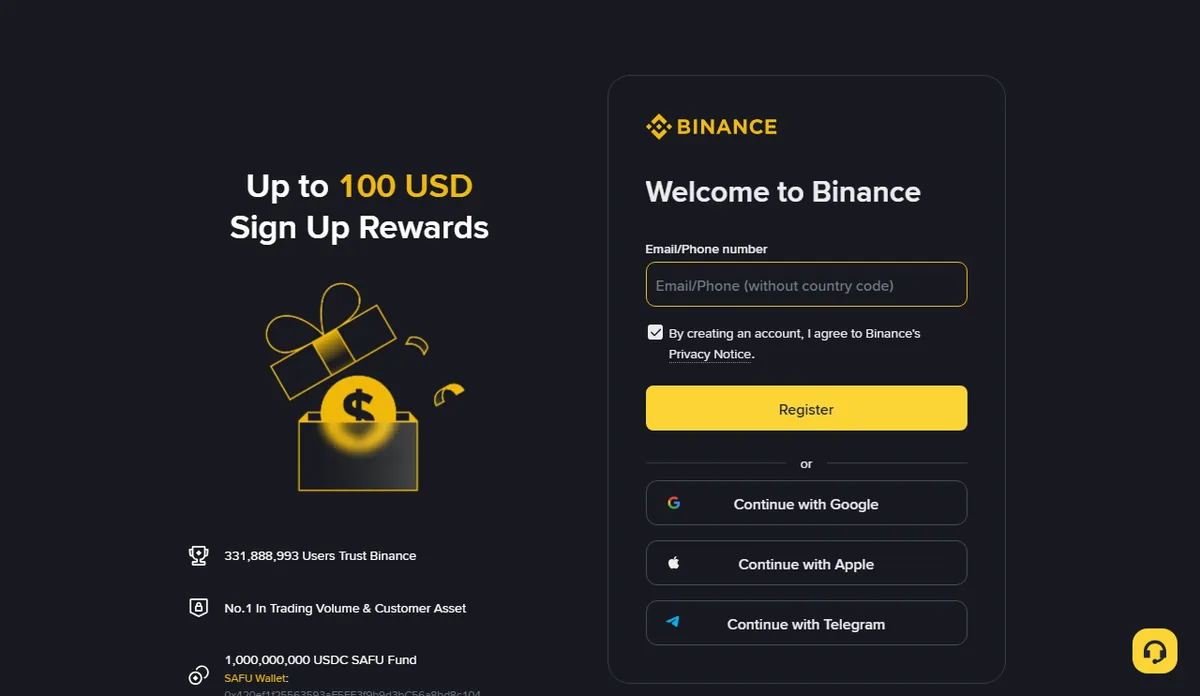
The first sign-up screen asks only for an email address or a phone number. Under a “Welcome to Binance” heading there’s a single “Email/Phone number” field, a checkbox to agree to the terms and privacy notice, and a Register button.
Step by step:
- Type the email address or phone number you chose earlier. Read it back once; a typo here sends codes to someone else or to nowhere.
- Read the terms and privacy notice if you want to know what you’re agreeing to, then tick the box.
- Press Register.
- Follow the screens that come next.
The same screen offers to continue with Google, Apple or Telegram instead. That’s a convenience, not a requirement. My own habit is to use a plain email address for anything that holds money, so that getting in doesn’t depend on another company’s login. If you do choose one of those buttons, make sure that account has a strong password and two-factor authentication of its own, because it becomes a key to this one.
The screens after the first one change more often, so I won’t describe them click by click. Read each one before pressing anything. If a screen asks for a code, the code should arrive at the email or phone you just typed and nowhere else. Type it only into the page you opened yourself, never into a page someone sent you, and never read it out to anyone. Nobody genuine will ask you for it.
You may also see a promotional panel on the sign-up page about sign-up rewards. Treat it as that day’s marketing: the conditions are Binance’s, they change, and nothing in this guide depends on them.
A few things can go wrong on the first screen:
- The page says the email or phone is already registered. Either you opened an account in the past and forgot, or someone used your details. Use the log-in and password-reset route rather than trying to open a second account.
- No code arrives. Look in the spam folder, check that the phone number has the right country code, and give it a few minutes before asking for another one.
- The page looks different from the screenshot. Layouts change. What matters is that there’s a field for an email or phone number and that the address bar shows binance.com. If it doesn’t, close the tab.
When sign-up finishes, you have an account, but not yet one that can receive. Verification comes next, after a short detour for people who registered without a code.
Signed up without a code? The 30-day conditions
If you registered without a referral code, you can add one only if every condition in Binance’s referral FAQ is met; if even one fails, the account stays without a code. The FAQ says a user who forgot to enter a code “can complete the referral binding process” only when all of these are true:
- The identity (KYC) information hasn’t been used on another Binance account in the past 180 days.
- The account has no existing referral relationship.
- It’s the parent (main) account, not a sub-account.
- It’s within 30 days of registration.
- There has been no deposit or trading activity on it.
- It isn’t flagged as a wash trader.
“KYC” stands for “know your customer”, the identity checks platforms run. A “wash trader” is someone who trades with themselves to fake activity; an ordinary new user has nothing to worry about there.
The condition that catches people is number five. The moment a payer’s test payment lands, the account has had a deposit and the window closes, even if you’re still inside the 30 days. So if you want a code and you qualify, deal with it before you share any address. The other time-sensitive one is number four: 30 days from registration, not from verification. If verification drags on, the clock is still running.
The second rule is shorter and final: “once the referral relationship has been established, it cannot be changed or removed.” That cuts both ways. If you signed up through a friend’s link, you can’t swap to another code later. If you signed up through ours, the same applies.
If you don’t meet the conditions, nothing else changes. You’ll receive, verify and sell exactly as anyone else does. I wouldn’t open a second account just to get a code. It’s more trouble than a fee discount is worth, and it leaves you with two sets of records at a platform that holds your money. The FAQ, linked in the sources box below, describes the binding process itself; I’m not copying menu names that weren’t on the pages I checked.
Verify your identity before anyone pays you
Verify first, then give out an address. Binance’s help page says a verified account can make crypto deposits, trade and use its products, and that existing unverified users are restricted to “Withdraw Only”. An account that can’t take a deposit is not a place to receive money.
Binance’s separate page on why verification is needed lists what it opens up: “Withdrawal/deposits, Ability to trade freely, Access to fiat, spot and futures accounts”. For someone being paid, the word that matters is deposits.
Where to start: go to [Account] → [Identification], or tap one of the verification banners on the home page. The steps, as Binance’s page describes them:
- Choose your country of residence.
- Choose the country that issued your document, then the document type. What’s offered depends on the country: passport, ID card or driver’s license.
- Upload photos of the front and the back. If you started on a computer, you can scan a QR code and continue on your phone instead.
- Do the face check, sometimes called a liveness check, which confirms a real person is holding the phone.
- Confirm your personal information. It must match the document.
- Submit, and wait for the review.
The review is “usually within 48 hours. However, it may take longer in some particular cases.” In the meantime, the verification page shows its status. Don’t give anyone an address until that status says you’re verified.
A few habits make the photos and face check go through the first time:
- Put the document on a plain, dark surface with all four corners in the frame. Tilt it slightly away from a window if the laminate throws glare across the name or the photo.
- For the face check, follow Binance’s instruction: no hat, no glasses, no filters, and enough light. Hold the phone at eye level and keep still when it asks you to.
- Type your name exactly as it appears on the document, including middle names and the spelling used there. If your name is usually written in another script, use the version printed on the document you uploaded.
- Use your own document. Never a relative’s, never a friend’s who’s “already verified”, never one the payer offers to lend you. The account has to be yours, in your name, because you’re the person who will answer for the money that arrives in it.
If verification is rejected, read carefully whatever the page says about why, fix that one thing, and submit again. Check the pictures first: a blurred corner, glare over the date of birth or a face check in poor light are easy things to miss. Don’t edit photos, don’t crop out details, and don’t switch to someone else’s documents to get it through. If the reason isn’t clear, contact support from inside the app or the website you opened yourself and ask.
If you’re waiting and the payer is waiting too, a short, honest message keeps things calm: tell them verification is in progress, give them a day you expect to be ready, and promise to send the address and network together once it’s done. That’s better than sending an address “to save time” and then explaining why their payment is stuck.
Where this comes from checked September 2026
The sign-up, verification and deposit steps come from Binance’s own help pages: How to complete identity verification for a personal account (updated 5 June 2026), “Why do I need to complete identity verification” (updated 2 April 2026), How to deposit crypto to Binance, the “Why hasn’t my deposit been credited” page (updated 19 December 2025) and the Deposit & Withdrawal Status page. The late-binding conditions and the rule that a referral can’t be changed come from the Referral Pro mode FAQ (updated 5 August 2026). The Binance Pay details come from Binance’s help pages on receiving and sending with Pay (updated June 2026). The sign-up screen description is from Binance’s public registration page as it appeared in September 2026; later screens aren’t described because we didn’t go past the first one.
Secure the account before money arrives
Before the first payment lands, do four things: set a password you use nowhere else, turn on two-factor authentication with an authenticator app, add a passkey if you’re offered one, and bookmark the real site. All four are much easier to do while the balance is still zero.
A password you use nowhere else. If you’ve ever reused a password, assume it’s in a leaked list somewhere. A password manager makes a long, unique one painless. If you don’t use one, a long phrase of unrelated words is better than a short, clever one.
Two-factor authentication with an authenticator app. Two-factor authentication (2FA) means that logging in or withdrawing needs something you have, not only something you know. An authenticator app on your phone generates a short code that changes every half minute, and it works offline. I prefer it to codes by text message, because a phone number can be moved to another SIM card by someone who talks their way past a mobile shop, and then the text messages go to them. If the setup screen shows a backup key, write it on paper and keep it somewhere private. That piece of paper is how you get back in if the phone is lost.
A passkey where it’s offered. A passkey lets your phone or computer confirm it’s you with a fingerprint, face or screen lock, and it only works on the real site it was created for. That last property is why I like it: a fake log-in page can’t use it. If Binance offers you a passkey during setup or later, adding one is worth the minute.
Secure the email too. Your email is the master key: a password reset goes there. Give it its own unique password and its own two-factor authentication. If your email is weaker than your Binance account, the email is the account’s real lock.
Bookmark the real site and stop clicking links. Fake log-in pages look exactly like real ones; only the address differs, sometimes by one letter. From now on, open Binance from your bookmark or the app you installed from your phone’s official app store. If an email says there’s a problem with your account, don’t click its button. Open the app yourself and look.
Nobody from support messages you first. This is the scam that follows people after they sign up. A message arrives on Telegram, WhatsApp, SMS or social media from “Binance support”, “the compliance team” or “your account manager”. Your account is “frozen”, a deposit is “on hold”, you must “verify” something through a link or send your codes. Real help works the other way round: you open support from inside the app or the site you reached yourself, and you ask. Anyone who contacts you first, asks for a code, asks you to install a screen-sharing app or asks you to move money “to protect it” is not someone to deal with.
Keep the phone itself locked. A screen lock, updates installed, and no apps from outside the official store. The phone now holds your authenticator, your email and your exchange app, so treat it like a wallet.
Payer-side trust is a separate question from account security. A payer can be completely honest and still send on the wrong network; a payer can also be the start of a scam that uses a “payment” as bait. The account security above protects you from outsiders. The test payment later, and the guide on checking a payment is real, protect you from the rest.
Find your deposit address and the right network
Your address comes from the Deposit screen: you choose the coin, then the network, and Binance shows an address and a QR code for that exact pair. On the website, the steps from Binance’s help page are:
- Go to [Deposit] → [Deposit Crypto].
- Choose the coin, for example USDT.
- Choose the network.
- Copy the address, or show the QR code.
- If you’re offered a choice of where the deposit lands, pick Spot or Funding.
- Send the address and the network name to the payer together.
The app asks for the same things in the same order: coin, network, then it shows the address.
Ask the payer first, then choose the network. USDT runs on several networks, for example TRON (often labeled TRC-20), BNB Smart Chain (BEP-20) and Ethereum (ERC-20). The payer’s wallet or exchange may support only some of them. Binance’s own instruction is: “Please make sure that the selected network is the same as the network of the platform you are withdrawing funds from.” So the order is: ask the payer which networks they can send USDT on, pick one that also appears on your Binance deposit screen, and only then copy the address shown for that network.
This is where money gets lost. If the payer sends on a network other than the one your address was given for, Binance warns the funds may be lost and not recoverable. Crypto payments generally can’t be pulled back once sent. That’s why the address and the network always travel together, in writing, in the same message.
A few details that trip people up:
- The labels differ between platforms. One wallet says “TRON”, another says “TRC20”, another “Tron (TRC-20)”. Those are the same network. What must match is the network, not the exact wording. If you’re not sure two labels mean the same thing, ask before anyone sends.
- The memo field. Some coins need a memo or tag as well as the address. Binance’s page describes it as “a unique identifier assigned to each account for identifying a deposit.” USDT on TRON, BNB Smart Chain or Ethereum normally has no memo, but the rule is simple: if the deposit page shows a memo field, the sender must include it, exactly as shown. A deposit sent without a required memo may not be credited.
- The minimum. The deposit page shows a minimum deposit amount. Binance says deposits below the minimum are not credited, so tell the payer, especially for a test.
- Copying. Use the copy button rather than retyping. After you paste the address into your message, compare the first six and the last six characters with the screen. Some malicious software swaps copied addresses for the attacker’s, and that quick check catches it. Never read an address out over the phone.
Spot or Funding: the deposit page may let you choose where incoming coins land. Spot is the wallet trading happens from; Funding is where Binance Pay receipts go. For a first payment the choice matters much less than the network. Pick one and remember which, so that when you check for the payment you look in the right place.
Here’s a message you can adapt. The network in it is only an example; use the one you and the payer agreed.
Payment details to send your payer
Please send USDT on the TRON (TRC-20) network only.
Address: [paste your address here]
If your wallet or exchange doesn't offer TRON for USDT, tell me before sending and I'll give you an address for a network we both have.
Could you send a small test amount first (at least [minimum from the deposit page])? I'll confirm as soon as it arrives, then you can send the rest.
If the payer only knows “USDT” and not the network, don’t guess on their behalf; ask them to look at the send screen in their own wallet or exchange and tell you the network names it lists.
When the payer is on Binance too: Binance Pay
If the person paying you also has a Binance account, Binance Pay can replace the address and network entirely. In the app, [Pay] → [Receive] shows a QR code or a payment link, and you can share that QR code, your Binance account email, your phone number or your Binance ID. Money received this way arrives in your Funding wallet.
On the sender’s side, Binance’s help page says the recipient must be a Binance user who has completed identity verification, which is one more reason to finish that step first. Transfers by email, phone number or Binance ID “are immediately credited. They cannot be recovered if you entered the wrong details.” So the risk moves from choosing the wrong network to typing the wrong recipient. Ask the payer to copy your ID or scan your QR code rather than type an email from memory.
Because nothing goes on-chain, there’s no blockchain network fee for these internal transfers. If there’s any platform fee, the Pay screen shows it before the payer confirms, so they can check it there.
Pay only works between two Binance accounts. A payer on another exchange or a personal wallet still needs a deposit address and a network. The guide on choosing between a Pay ID and a deposit address sets out which to give in each case.
Take a small test payment and confirm it
Ask for a small test first, confirm it in your own Binance account, and only then tell the payer to send the rest. A test turns a possible loss of the full amount into a possible loss of a small one, and it proves the address, the network and any memo in one go.
It does cost the payer something. Each on-chain transfer carries a network fee, and the sender pays it, so a test means one extra fee for them. For a new payer and a first payment, I’d still ask. After one successful payment on the same address and network, most people skip the test next time, and that’s reasonable.
Two details make the test useful rather than confusing. It must be above the minimum deposit shown on your deposit page, or it won’t be credited at all. And it should be sent exactly the way the full payment will be: same wallet or exchange on the payer’s side, same network, same address.
To confirm the test:
- Ask the payer for the transaction ID, also called the TxID or hash. It’s a long string of letters and numbers that their wallet or exchange shows after sending.
- Open Binance yourself, from your bookmark or the app, and look at your deposit history. A new deposit usually shows as in progress while the network confirms it, then as completed. The exact wording may differ; what matters is that it reaches the completed state and your balance goes up.
- If you want a second view, paste the TxID into a block explorer for that network: Tronscan for TRON, BscScan for BNB Smart Chain, Etherscan for Ethereum. It shows whether the transfer succeeded, the address it went to, the token and the amount.
- Once your balance shows the test, tell the payer it arrived and that they can send the rest.
How long it takes depends on the network. Binance says confirmation time “varies depending on the blockchain and its current network traffic.” For scale, TRON produces a block about every 3 seconds and Ethereum works in slots of about 12 seconds, but an exchange waits for a number of confirmations before crediting, so expect minutes rather than seconds.
Don’t treat a screenshot, an email saying “payment sent” or a message from the payer’s bank as confirmation. Those can be edited or faked, and fake proof is how a whole family of scams works. Your own balance, opened by you, is the only confirmation that counts. The guide on checking that a crypto payment has arrived walks through the explorer view line by line.
After the test arrives
The test payment has arrived in my account. Thank you. You can send the remaining amount the same way: same address, same network.
Snags, sorted by what you see on screen
Most first-week problems show up as one of a handful of screens. Find the one that matches yours.
Verification still says it’s being reviewed
That’s the normal state for a while. Binance’s page says reviews usually finish within 48 hours and can take longer in some cases. Don’t submit again while the first review is still open, don’t try a second account, and don’t hand out an address yet. If it’s well past two days, contact support from inside the app and ask for the status. Meanwhile, tell the payer the date you expect to be ready.
Verification was rejected
Read what the page says about why, fix that specific thing and resubmit. Look again at the tips in the verification section: glare, a cut-off corner, a blurred picture or a name typed differently from the document are the first things to check. Use only your own document.
The account says “Withdraw Only”
Binance restricts existing unverified accounts to withdrawals. That means verification isn’t finished. Complete it before anyone sends you a deposit; there’s no shortcut here, and anyone offering one is not someone to trust.
The deposit shows as pending
The network hasn’t reached the number of confirmations Binance needs for that coin. Binance’s help page gives Bitcoin as an example, needing at least 2 network confirmations before crediting. Pending is usually a matter of waiting. If the explorer shows the transaction as still unconfirmed, the delay is on the blockchain side, not at Binance.
The network shows as paused or suspended
Binance has a Deposit & Withdrawal Status page that lists networks where deposits or withdrawals are temporarily suspended, for example during wallet maintenance. On the day we looked, it showed one USDT network with deposits partly suspended. It changes, so check it live before you tell a payer which network to use. If your chosen network is paused, ask the payer to wait, or agree on a different network and give them the address shown for that one. Don’t let them send on a paused network and hope.
The explorer says it succeeded, but your balance hasn’t changed
Binance’s help page on uncredited deposits lists the usual reasons: confirmations still pending, a token or network Binance doesn’t support for that deposit (which may mean the funds are lost), a wrong address or a wrong or missing memo, an amount below the minimum, or wallet maintenance on that network. Check each against what the payer actually did. If none explains it, contact support from inside Binance with the TxID, the coin, the amount and the time it was sent. The page mentions 24/7 chat support. The guide on a Binance deposit that seems to be on hold goes through each case.
Someone “from Binance” messages you to help
This isn’t a snag; it’s a warning sign. People who post online about a stuck deposit often get messages from “support” within minutes. Real support doesn’t start the conversation in a chat app. Close it, and go back to the help chat inside Binance.
Fees and the referral discount, in plain terms
Receiving USDT and converting it are different events with different costs. When the payer sends you USDT, the network fee is theirs. When you later trade USDT for something else on Binance, a trading fee applies to that trade. The referral discount is a discount on trading fees, the one shown on Binance’s page when you sign up.
Signing up with a code doesn’t make you pay more. No fee is added because you used one. If you didn’t use a code, you pay the standard trading fees; if you did, the trading fee is reduced by whatever the discount was at sign-up. At the time of writing that was up to 20% off, and Binance can change it.
To make that concrete, here’s an example with invented round numbers, not Binance’s actual rates. Say a trade’s fee would be 1.00 USDT without a discount. With a 20% discount, the fee is 1.00 × (1 − 0.20) = 0.80 USDT. The saving is 0.20 USDT on that trade. It adds up only if you trade often; on a single conversion it’s small.
What the discount doesn’t touch:
- The network fee the payer pays when sending you USDT.
- The price a buyer offers in a P2P ad. That price is set by the ad, and the gap between it and the market rate is often the biggest cost of cashing out.
- The minimum deposit, verification, or anything about how deposits are credited.
For the live fee figures, look at Binance’s own fee information at the time you trade rather than any number you read in a guide, including this one. And don’t sign up for anything, or choose a platform, because of the discount alone. Whether the platform serves your country, whether you can sell to your own bank there, and whether you understand the steps all matter more.
What to do next
With a verified, secured account and one confirmed test payment, you’re ready to be paid properly. The next decisions depend on what you want to do with the money.
If you need local currency, the usual route on Binance is the P2P market, where you sell USDT to a buyer who pays you by bank transfer or a local payment app. It’s also where new sellers get caught by fake payment confirmations, so read how to sell USDT on Binance P2P for the first time before your first sale. The one rule that matters most: release the coins only after the money is in your own bank app.
If the same payer will pay you regularly, save your address and network in a note along with the wording that worked, and reuse it. The guide on what to send your payer has versions for clients, employers and family members.
If you don’t need local money straight away, you can leave the USDT where it is while you decide. Keep the two-factor authentication on, keep opening Binance from your bookmark, and keep saying no to anyone who messages you first.
Questions readers ask
Can I add a referral code after I have already signed up?
Only if every condition in Binance's referral FAQ is met: you are within 30 days of registration, the account has had no deposit or trading activity, it is the main account, it has no referral relationship yet, your identity details have not been used on another account in the past 180 days, and the account is not flagged as a wash trader. If any one fails, the code can't be added.
Can I change or remove a referral code later?
No. Binance's referral FAQ says that once a referral relationship has been established it cannot be changed or removed, so the code attached at sign-up is the one that stays.
How long does Binance identity verification take?
Binance says the review usually finishes within 48 hours but may take longer in some cases. Start verification several days before you expect to be paid, not on the day.
Do I have to verify before someone can pay me?
In practice, yes. Binance says verification is what allows crypto deposits, and existing unverified accounts are restricted to Withdraw Only. Finish verification first, then give the payer an address.
Does signing up with a referral code make me pay more?
No. A referral code doesn't add any fee. The discount it brings applies to trading fees, the one shown on Binance's page when you sign up, and it doesn't change how deposits or network fees work.